Documentation | NestJS - A progressive Node.js framework
Nest is a framework for building efficient, scalable Node.js server-side applications. It uses progressive JavaScript, is built with TypeScript and combines elements of OOP (Object Oriented Programming), FP (Functional Programming), and FRP (Functional Rea
docs.nestjs.com
Pipe란?
Pipe란 @Injectable() 로 데코레이팅된 클래스로, PipeTransform 인터페이스를 implements함.
Controller에 들어가기 직전의 데이터 검증 및 변환
Pipe의 2가지 사용 케이스
- transformation: input data를 원하는 형식의 폼으로 변환(e.g., string → integer)
- validation : input data가 유효한지 검사한 뒤, 유효한 경우 아무런 변경 없이 다음 로직으로 보냄. 유효하지 않은 경우 , exception을 던짐.
Built-in Pipes

예시를 봐보자!
id에 해당하는 post를 가져오는 controller이다.
  @Get(':id')
  getPost(@Param('id') id: string) {
    return this.postsService.getPostById(id);
  }
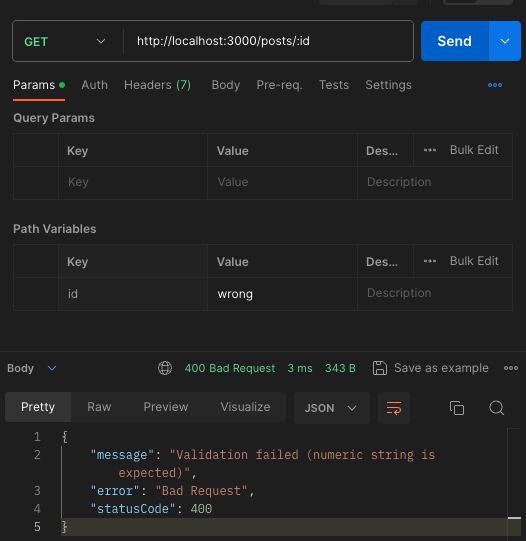
위 경우, id는 string으로 받아야 한다.
url에서 id 를 추출하는 것이므로, string으로 전달된다.
이때 id를 number로 변환하고 검증하고 싶다면, pipe를 사용한다.
  @Get(':id')
  getPost(@Param('id', ParseIntPipe) id: number) {
    return this.postsService.getPostById(id);
  }
위 경우, id가 잘못된 값이 들어와 number로 변환할 수 없는 값이라면, pipe가 알아서 error를 던져준다.
예시)
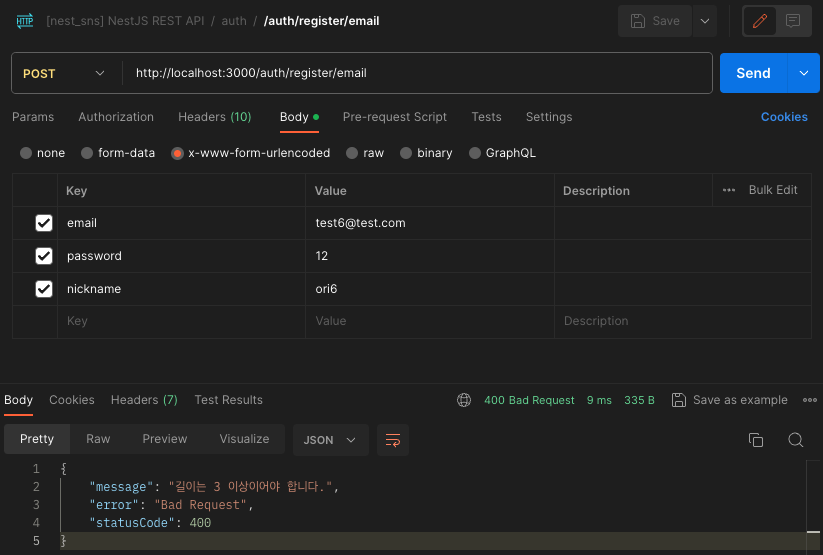
ParseIntPipe를 통해 값을 검증하는 경우
ParseIntPipe를 사용하지 않는 경우

에러의 내용을 통해 pipe가 실제로 값을 검증하고, 검증 실패 시 에러를 던진다는 것을 알 수 있다.
pipe를 통해 잘못된 요청이 로직에 들어가는 것을 막을 수 있다.
디버거를 통해 값을 확인해보자!
ParseIntPipe를 통해 값을 검증하는 경우

id 값에 숫자 3이 들어간 것을 볼 수 있다.
ParseIntPipe를 사용하지 않는 경우

id 값에 문자 '3'이 들어간 것을 볼 수 있다.
Custom Pipe 를 만들어보자
기본형태
import { PipeTransform, Injectable, ArgumentMetadata } from '@nestjs/common';

@Injectable()
export class ValidationPipe implements PipeTransform {
  transform(value: any, metadata: ArgumentMetadata) {
    return value;
  }
}
e.g) 비밀번호가 6자 이상, 12자 이하여야 한다고 가정해보자!
이를 검증하는 custom pipe를 만들어보자.
// src/auth/pipe/password.pipe.ts
import {
  PipeTransform,
  Injectable,
  ArgumentMetadata,
  BadRequestException,
} from '@nestjs/common';

@Injectable()
export class PasswordPipe implements PipeTransform {
  transform(value: any, metadata: ArgumentMetadata) {
    if (value.toString().length < 6 || value.toString().length > 12) {
      throw new BadRequestException(
        '비밀번호는 6자 이상, 12자 이하여야 합니다.',
      );
    }

    return value.toString();
  }
}
// src/auth/auth.controller.ts

import { Body, Controller, Post } from '@nestjs/common';
import { AuthService } from './auth.service';
import { PasswordPipe } from './pipe/password.pipe';

@Controller('auth')
export class AuthController {
  constructor(private readonly authService: AuthService) {}

  @Post('register/email')
  postRegisterEmail(
    @Body('nickname') nickname: string,
    @Body('email') email: string,
    @Body('password', PasswordPipe) password: string,
  ) {
    return this.authService.registerWithEmail({
      nickname,
      email,
      password,
    });
  }
}
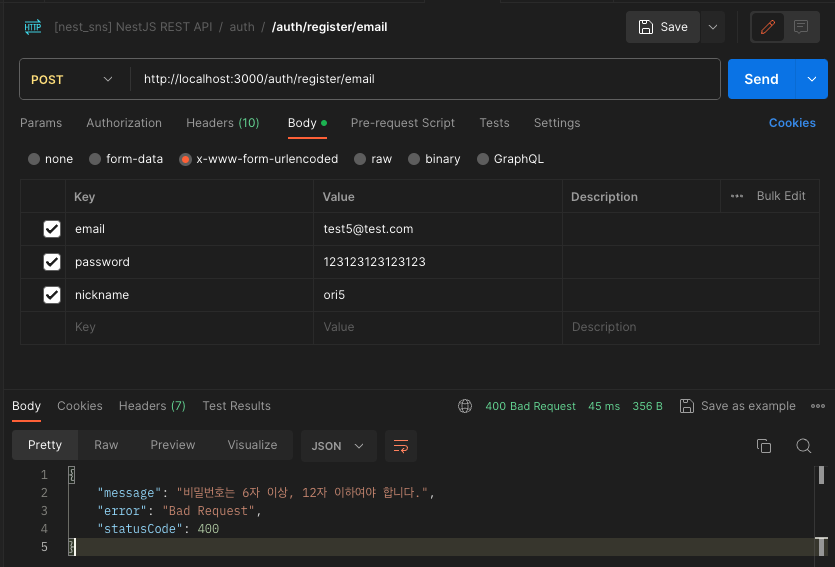
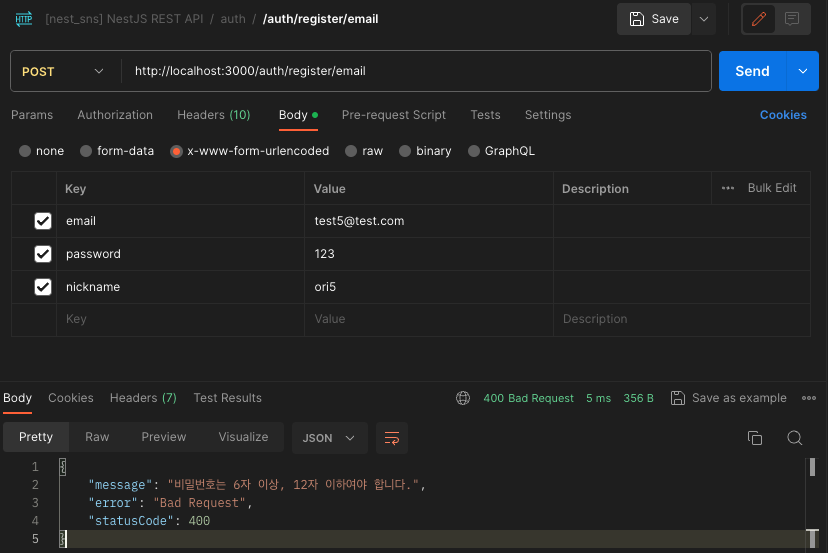
Custom pipe가 잘 작동하는 것을 볼 수 있다.
만약 길이에 대한 제한을 일반화하고 싶으면 어떻게 해야할까?
Max길이에 대한 제한을 거는 pipe를 만들어보자.
// src/auth/pipe/password.pipe.ts

@Injectable()
export class MaxLengthPipe implements PipeTransform {
  constructor(public readonly length: number) {}

  transform(value: any, metadata: ArgumentMetadata) {
    if (value.toString().length > this.length) {
      throw new BadRequestException(`길이는 ${this.length} 미만이어야 합니다.`);
    }

    return value.toString();
  }
}
위와 같은 방식으로 MinLengthPipe도 만들 수 있을 것이다.
// src/auth/auth.controller.ts

import { Body, Controller, Post, Headers } from '@nestjs/common';
import { AuthService } from './auth.service';
import {
  MaxLengthPipe,
  MinLengthPipe,
} from './pipe/password.pipe';

@Controller('auth')
export class AuthController {
  constructor(private readonly authService: AuthService) {}

  @Post('register/email')
  postRegisterEmail(
    @Body('nickname') nickname: string,
    @Body('email') email: string,
    @Body('password', new MaxLengthPipe(12), new MinLengthPipe(3))
    password: string,
  ) {
    return this.authService.registerWithEmail({
      nickname,
      email,
      password,
    });
  }
}
잘 되는지 확인해보자